

Getting started with 3D modeling using Pix4D Cloud
By Eric Grumling
One of Mountain West UAS’s corporate sponsors is Pix4D. As part of the sponsorship they have established a educational license for organization members. I took advantage of the license last fall and over the winter to learn more about how Pix4D Cloud works and generate a few sample models.
Disclaimer: I am not by any means an expert at 3D modeling, photogrammetry and I am certainly not a professional surveyor. The scans I create are for entertainment purposes only.
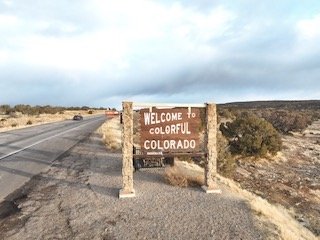
As a way to build flight hours and practice mapping and modeling I’ve been modeling some of the old buildings around western Colorado and southeastern Utah. Most of these old structures are in rural areas, class G airspace, so planning isn’t as much of a problem as it might be in busy urban corridors. And I enjoy exploring historical places that might be off the beaten path. Over the winter I tried to capture and model the Dewey Bridge, the first suspension bridge over the Colorado River, located just northeast of Moab along the Colorado river. On the way home from one of the capture days I noticed that I70 traffic was nearly non-existent, probably because it was the NFC wildcard playoff weekend. Given how light the traffic was I thought I might try to capture something I’ve had my eye on for some time: The Welcome to Colorful Colorado sign and obelisk at the Utah border. Now, I know what you’re thinking: Flying close to a highway? But the traffic was very light and the fact is that the Welcome sign is well off the road because many people stop and grab a selfie. I did not even pass over the breakdown lane, and was wearing my high-visibility jacket and used the Firehouse Technology beacon just to enhance visibility. I maintained situational awareness as any pilot should, and was ready at any moment to abort the mission and land.

For this mission I had my DJI Mavic 3 Cine and about 3/4 of a battery remaining after spending the afternoon at the Dewey Bridge. So it was going to be a quick flight no matter what. Pix4D has an app that can automate much of the flying, but unfortunately the Mavic 3 Cine isn’t supported. No worry, there’s an easy work-around: just set up the camera in intervalometer mode. This will take a picture every 1, 5 or 10 seconds. If you have enough light to set a high shutter speed (800 or greater) and fly at a reasonably slow pace, you shouldn’t have any blurring or rolling shutter issues. Set your exposure manually -I’ve found that pushing exposure a stop or two higher helps in shadow areas, and make sure you have a lot of space available on your memory card. I usually shoot JPEG but I believe Pix4D will support DJI raw format as well.
Since this was a manual flight and very limited duration, I thought out my flight path ahead of time. The idea was to fly a very basic “lawnmower” pattern four times. First time with the aircraft pointed west, the second pass pointed east and the last ones northeast and southwest, holding the gimbal at about 45º. The basic path was the same each time, as straight as I could manually fly back and fourth over the sign and obelisk. Altitude was only about 30 ft AGL to capture a lot of detail. Basically I just flew back and forth with the drone pointed in the same direction for each pass. The most challenging part was flying on a 45º angle for the oblique passes. Each pass was only using the pitch and roll stick to maintain orientation. I’ve found this produces fairly good results with little effort. A 13 minute flight yielded 234 images, which should be more than enough to produce a fair quality point cloud.
Up until this project I use Agisoft Metashape Standard for MacOS. I’ve also used Open Drone Map with good results. I had tried Pix4D-Matic, their desktop software, several years ago so I was somewhat familiar with the workflow. The Pix4D Cloud interface will be familiar to anyone who’s tried out photogrammetry software before. Basically the workflow goes something like this:
Download the photos to your computer
Make corrections for exposure. Photos shouldn’t have blown-out whites or no detail blacks. In some cases it might be better to “crush” the blacks to bring out details. Experiment to see what the software wants to see. If you properly set your exposure you shouldn’t need to make many adjustments.
Log into Pix4D cloud.
Start a new project
Upload photos
Check the preview to see if it looks right - sometimes things go sideways and it can’t match anything.
Begin processing. I usually start processing before bedtime, but for Pix4D Cloud they have plenty of processing power available, especially for small projects like this one. When processing is compete you’ll get an email.
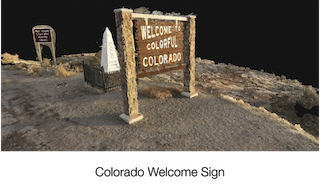
Log back in and check your project. You should have a Point Cloud and a Textured Mesh.
https://cloud.pix4d.com/dataset/1742732/model?shareToken=fe2f567f-e18c-4460-9911-54301b5a4068
Click the checkboxes on each to view. The Point cloud will often look very good from a distance but as you zoom in you’ll notice a lot of gaps. The 3D textured mesh will fill in completely but also might appear a little odd depending on how well the mesh maps onto the point cloud. You can navigate the 3D model with click and drag motions, scroll wheels and pinch to zoom on an iPad.
I have to say I’m pretty impressed with the result. With very little effort to adjust the pictures ahead of time, and almost no time at all to process, Pix4D Cloud might be a good option for quick projects or just learning about photogrammetry. And you don’t really need to use a drone either. Pix4D will work with most cameras, even smartphones. It helps to have good EXIF geolocation and orientation data but I believe it can generate good models just using the pictures alone.
And if you work with a surveyor and ground points you can use Pix4D to locate a model anywhere on Earth to within a few centimeters. That’s when things get interesting.